JWT Guard
JWT Guard is a free, open source, test suite written in C# for testing the security of JSON Web Token (JWT) implementations. It is designed to be used primarily by developers to test if their ASP.NET Core Web APIs are properly validating JWT access tokens.
Table of Contents
What does JWT Guard do for you?
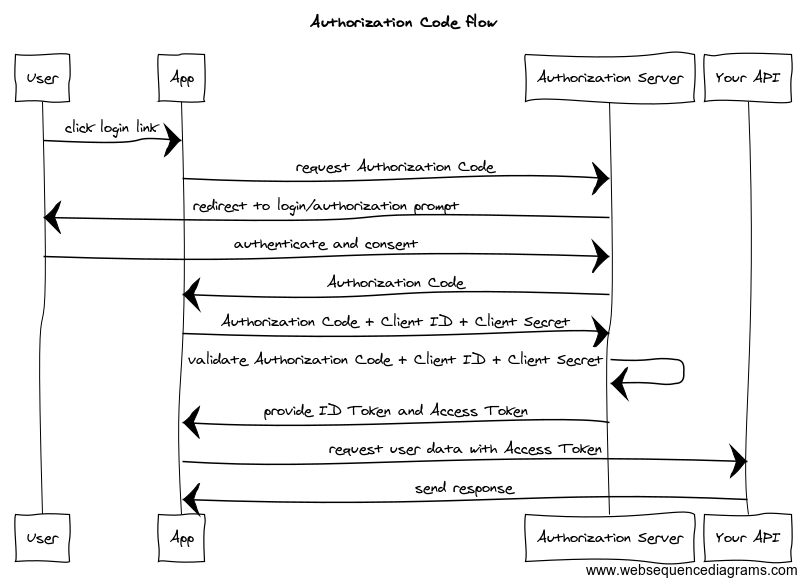
When you have a client application that interacts with your API, you typically rely on an OAuth 2.0 flow where an authorization server issues access tokens for the client (or the user using that client), to access a specific resource server, also known as your API:

Example of “Authorization code flow” to retrieve an access token for an API resource. Image courtesy of Postman.
The easiest way to implement this flow and to protect your API when using ASP.NET Core, is to use the Microsoft.AspNetCore.Authentication.JwtBearer NuGet package. Likewise, for other programming languages and web frameworks, similar open-source solutions exist.
While it’s a good practice to use well-known solutions for a problem, you’re also placing your trust in an open-source package to protect your API resources.
And this is where JWT Guard can help you: by adding the JWT Guard test suite to your project, you can automatically verify on each build of your API, that the JWT validation logic still functions as expected. To do so, JWT Guard adds some specific test cases to your solution to validate that:
- valid JWT access tokens are accepted by a protected endpoint of your API.
- invalid JWT access tokens are being rejected.
How does JWT Guard work?
Every test in the JWT Guard test suite is an integration test against your API. When a test runs, your API is started in the background and the JWT Guard test will attempt to access the configured target API endpoint with a variety of JWT access tokens. For more information about how to configure JWT Guard, see Test Settings.
To issue these tokens, JWT Guard spins up an instance of Duende IdentityServer 1 to retrieve valid signing credentials, and slightly reconfigures your API to find the public keys generated by Duende IdentityServer, by changing the JwtBearerOptions.Authority and TokenValidationParameters.ValidIssuer parameters respectively. The JWT access tokens are then created specifically for each test, and either signed with a credential generated by Duende IdentityServer, or another credential for a specific test scenario.
Now, you might think that you’re placing your trust in yet another open-source solution that claims to improve your API’s security, and you’re correct in doubting that trust. JWT Guard is completely open-source, so you can verify every line of code. Furthermore, when you add JWT Guard to your project, you actually have a full copy of the code in your own solution.
So feel free to:
- make changes to any of the tests to better fit your API
- replace JWT Guard’s token issuer service and connect with your own service instead
- and so on…
Getting started
To get started, you’ll need to first install the JWT Guard project template by using the dotnet CLI:
dotnet new install JWTGuard.Template
This allows you to use either dotnet new jwt-guard or use Visual Studio to add a JWT Guard test project to your existing solution. Using the dotnet CLI, you can add a JWT Guard test project by using the following command:
dotnet new jwt-guard --apiProject ..\\relative\\path\\to\\your\\webapi.csproj
Or, using the shorthand notation:
dotnet new jwt-guard -ap ..\\relative\\path\\to\\your\\webapi.csproj
This will add the JWT Guard test project to your solution and configure it to test the specified Web API project. The test project will be added to the solution in its own folder, so you probably want to start the relative path to your Web API project with ../, for example, ../MyApi/MyApi.csproj.
Configuring JWT Guard
Before you can run the JWT Guard test suite, you’ll most likely need to update some settings and perhaps add a few lines of code to your API project. Let’s step through these steps.
1. Configuring the target API testing endpoint
JWT Guard needs to perform its tests against a secured API endpoint to verify the functionality of the JWT Bearer token middleware used by ASP.NET Core. By default, it is configured use the API endpoint /weatherforecast, but you can very easily override this setting by going into the TestSettings.cs file.
At the top of the file, you can override the default test settings in the static constructor. For example, if target endpoint in your API is /your-secure-api-endpoint, your configuration would look like this:
public readonly struct TestSettings
{
    /// <summary>
    /// Static constructor for the <see cref="TestSettings"/> struct.
    /// </summary>
    static TestSettings()
    {
        // Override the default test settings here
        CurrentTestSettings = DefaultTestSettings with
        {
            TargetUrl = "/your-secure-api-endpoint"
        };
    }

    // ... the rest remains as-is.
}
More information about the different test settings can be found at Test Settings.
2. Make your API project compatible with the JWT Guard test project
JWT Guard contains integration tests, which uses a WebApplicationFactory implementation to run the Web API project during each test run. For this to work correctly, the factory class needs to be able to find the Web API project’s Program class. Newer C# projects using top-level statements, however, have no explicit Program class. If your project uses top-level statements, you’ll need to add a partial Program class:
// ... contents of your Program.cs

public partial class Program {}
That should be enough in order to run the JWT Guard test suite! In case you encounter issues, we have documented the most frequently occuring ones in the Troubleshooting section.
-
JWT Guard uses Duende IdentityServer only to generate and manage the default token signing credentials, and to allow the API under test to find the public key material via the discovery URI
.well-known/openid-configuration. While it’s not free for use in commercial products, it is free to use for testing purposes. ↩